
Building a Node.js serverless video chat application using AWS Lambda, DynamoDB and WebRTC
This post is the first of a series of articles that will describe step-by-step the development of a simple video chat application using only serverless technology. This first post will focus on the AWS serverless back-end.
We are going to explore the following technologies:
- AWS Cognito for authentication;
- AWS Lambda and AWS API Gateway in the back-end;
- AWS DynamoDB as our data-store;
- React and WebRTC on the front-end;
Prerequisites
Check if your environment has the following requirements installed:
You will also need an AWS account with administrator privileges and previous knowledge about the AWS services involved.
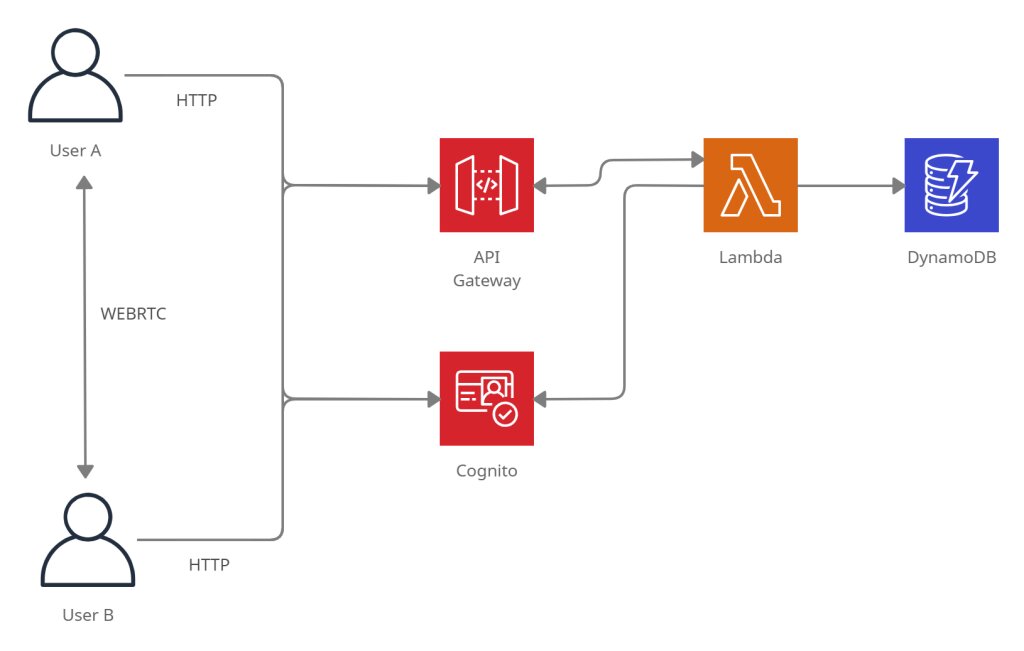
Application Architecture
Our application will be composed of a React front-end that will call a set of AWS Gateway API REST endpoints to manage the user’s contact list. The front-end will also connect to a WebSocket endpoint used to exchange ICE candidates during the WebRTC negotiation. All data will be stored in DynamoDB, and the business logic implemented using AWS Lambda functions running on Node.js.
The source code of the project is available at GitHub.
The Serverless framework
To organize our back-end code and automate the creation of resources, we will use the Serverless framework. The Serverless Framework allows us to build complex serverless back-ends with dozens of lambda functions, automate the creation of cloud resources and deploy to several providers, like AWS, GCP, or Azure.
The framework’s command-line tool can be installed via npm with:
$ npm install -g serverless
This will install a new tool called sls or serverless to the path.
Introduction to the Serverless framework
To create a new Node.js serverless project with support to AWS, execute the following command:
$ sls create --template aws-nodejs --path video-chat
This will use the AWS provider to create our back-end project structure inside the video-chat directory with a sample Lambda function that echoes the request received.
The Serverless framework uses the serverless.yml to store the project’s configuration. You can have many serverless.yml inside sub-folders to better organize related resources. The range of configuration options available is going to depend on the provider chosen for the project. Here is the main structure of the Serverless configuration file of our recently created project:
service: my-video-chat
frameworkVersion: '2'
The beginning of the file has a definition of the service name and the framework version.
provider:
  name: aws
  runtime: nodejs12.x
The provider entry defines configurations entries specific to the AWS provider.
functions:
  hello:
    handler: handler.hello
The functions entry has the definition of each lambda function. The handler points to the file and function declared inside the file that is going to be called.
In the example above, the function hello inside the handler.js file will be included in the project.
The configuration file supports the expansion of expressions with ${}. Command-line options can be read using the expression ${opt:name, 'default value'},
self references to the configuration file can use ${self:path}, system environment variables can be read using ${env:name} and files can be imported with ${file(path)}.
The AWS provider also supports reading CloudFormation output and variables from S3 or the SSM Parameter Store.
For more details, check the official documentation.
Building the project
To build the project, use the following command:
$ sls package
The deployment can be done using the following command:
$ sls deploy --aws-profile serverless
The --aws-profile points to the name of the AWS profile with the user credentials used by the tool. It’s recommended to create a separate IAM user with programmatic access to the AWS API and administrator rights.
Configuring our Serverless project
First, let’s define the region and the stage our API will be deployed. Add the following entries to the provider configuration:
  stage: ${opt:stage, 'dev'}
  region: ${opt:region, 'us-east-1'}
By default, we are going to use the dev stage and the us-east-1 region. We can change this variables by providing the values on the command-line.
The Serverless project created supports only Javascript, but we are going to use Typescript. To add Typescript support, follow the steps below.
- Create a
package.jsonfile with the following dependencies:
  "dependencies": {
    "aws-xray-sdk": "^3.3.3",
    "axios": "^0.21.1",
    "jsonwebtoken": "^8.5.1",
    "jwk-to-pem": "^2.0.5",
    "source-map-support": "^0.5.19",
    "uuid": "^3.3.2",
    "winston": "^3.2.1"
  },
  "devDependencies": {
    "@aws-sdk/types": "^3.20.0",
    "@types/aws-lambda": "^8.10.78",
    "@types/jsonwebtoken": "^8.5.1",
    "@types/node": "^12.12.6",
    "aws-sdk": "^2.943.0",
    "serverless-iam-roles-per-function": "^3.2.0",
    "serverless-webpack": "^5.5.1",
    "ts-loader": "^8.3.0",
    "typescript": "^4.3.5",
    "webpack": "^4.46.0"
  }
- Install the new dependencies with:
$ npm install
- Add a
tsconfig.jsonto the project’s root to configure the Typescript compiler.
{
  "compilerOptions": {
    "lib": [
      "es2017"
    ],
    "moduleResolution": "node",
    "noUnusedLocals": true,
    "noUnusedParameters": true,
    "sourceMap": true,
    "target": "es2017",
    "outDir": "lib"
  },
  "exclude": [
    "node_modules"
  ]
}
- Create a
webpack.config.jsfile to configure the Webpack transpiler:
const path = require('path');
const slsw = require('serverless-webpack');

module.exports = {
  mode: slsw.lib.webpack.isLocal ? 'development' : 'production',
  entry: slsw.lib.entries,
  devtool: 'source-map',
  resolve: {
    extensions: ['.js', '.jsx', '.json', '.ts', '.tsx'],
  },
  output: {
    libraryTarget: 'commonjs',
    path: path.join(__dirname, '.webpack'),
    filename: '[name].js',
  },
  target: 'node',
  module: {
    rules: [
      { test: /\.tsx?$/, loader: 'ts-loader' },
    ],
  },
};
- Enable the plugins by adding the following snippet to the
serverless.yamlfile:
plugins:
  - serverless-webpack
  - serverless-iam-roles-per-function
The serverless-webpack plugin will integrate the Webpack tool with the serverless build process. The serverless-iam-roles-per-function will allow us to define granular IAM permissions per function. By default, the permissions are defined globally.
The serverless framework has hundreds of plugins that can extend its functionality. Check the plugin directory for more information.
- Check if the build is still working after the changes:
$ sls package
Creating the database
The application will use DynamoDB to store the user’s contact information and track the active WebSocket connections. We will have 3 tables:
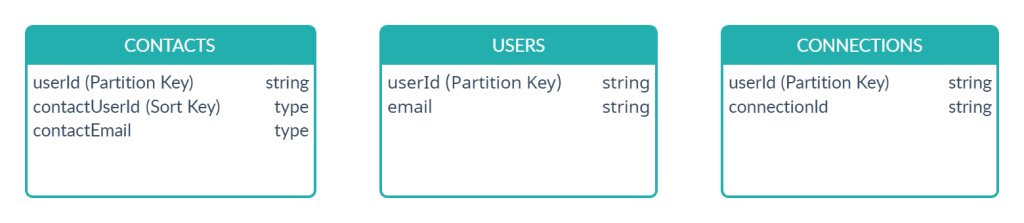
Some searches will also require some secondary indexes that will be defined below.
The Serverless framework allows us to define CloudFormation resources to automate the creation of DynamoDB tables. As we refer to the tables and indexes names several times inside the CloudFormation script and IAM permissions, we will define the table names as environment variables inside the configuration. These variables will also be available at runtime to our lambda execution environment. Add the following snippet inside the provider entry of the configuration file:
provider:
  # (...)
  environment:
    CONTACTS_TABLE: ${self:service}-contacts-${self:provider.stage}
    USERS_TABLE: ${self:service}-users-${self:provider.stage}
    CONNECTIONS_TABLE: ${self:service}-connections-${self:provider.stage}
    USER_ID_INDEX: UserIdIndex
    USER_EMAIL_INDEX: UserIdIndex
Now let’s add the DynamoDB tables definitions. The resources section of the configuration file gives us the ability to define CloudFormation resources using the YAML template syntax. The resources defined here will be automatically created when the application is deployed to the cloud.
resources:
    Resources:
      ContactDynamoTable:
        Type: AWS::DynamoDB::Table
        Properties:
          AttributeDefinitions:
            - AttributeName: userId
              AttributeType: S
            - AttributeName: contactUserId
              AttributeType: S
            - AttributeName: contactEmail
              AttributeType: S
          KeySchema:
            - AttributeName: userId
              KeyType: HASH
            - AttributeName: contactUserId
              KeyType: RANGE
          BillingMode: PAY_PER_REQUEST
          TableName: ${self:provider.environment.CONTACTS_TABLE}
          GlobalSecondaryIndexes:
            - IndexName: ${self:provider.environment.USER_ID_INDEX}
              KeySchema:
                - AttributeName: userId
                  KeyType: HASH
                - AttributeName: contactEmail
                  KeyType: RANGE
              Projection:
                ProjectionType: ALL

      UserDynamoTable:
        Type: AWS::DynamoDB::Table
        Properties:
          AttributeDefinitions:
            - AttributeName: userId
              AttributeType: S
            - AttributeName: email
              AttributeType: S
          KeySchema:
            - AttributeName: userId
              KeyType: HASH
          BillingMode: PAY_PER_REQUEST
          TableName: ${self:provider.environment.USERS_TABLE}
          GlobalSecondaryIndexes:
            - IndexName: ${self:provider.environment.USER_EMAIL_INDEX}
              KeySchema:
                - AttributeName: email
                  KeyType: HASH
              Projection:
                ProjectionType: ALL

      ConnectionsDynamoTable:
        Type: AWS::DynamoDB::Table
        Properties:
          AttributeDefinitions:
            - AttributeName: userId
              AttributeType: S
            - AttributeName: connectionId
              AttributeType: S
          KeySchema:
            - AttributeName: userId
              KeyType: HASH
            - AttributeName: connectionId
              KeyType: RANGE
          BillingMode: PAY_PER_REQUEST
          TableName: ${self:provider.environment.CONNECTIONS_TABLE}
Check the AWS documentation for more information about how to create DynamoDB tables using CloudFormation.
Application’s data layer
The application functions will access DynamoDB using the DynamoDB.DocumentClient from the AWS SDK.
I’ve created three DAO classes to encapsulate the data access to DynamoDB: UsersDAO, ConnectionsDAO, and ContactsDAO. You can check the source code here.
Creating the REST API
Our application will have 4 REST endpoints:
- GET /contacts : Gets the current user contacts
- POST /contacts : Adds a new user to your contact list
- DELETE /contacts/{contactId} - Deletes an user from you contact list
- GET /user : Gets the current user information
All these endpoints will be authenticated using AWS Cognito. To create Cognito’s user pool and integrate it with our front-end authentication follow this previous post’s instructions.
First, configure an environment variable with the user pool’s ARN:
provider:
    # ...
	environment:
	    # ...
    	USER_POOL: arn:aws:cognito-idp:us-east-1:************:userpool/us-east-1_********
The source code for the four lambdas below is available here. We will need to configure each function in the serverless.ymlfile. Here is an example of the configuration for the GET endpoint:
functions:
    GetContacts:
        handler: src/lambda/getContacts.handler
        events:
          - http:
              method: get
              cors: true
              path: contacts
              authorizer:
                arn: ${self:provider.environment.USER_POOL}
        iamRoleStatements:
          - Effect: Allow
            Action:
              - dynamodb:Query
            Resource: arn:aws:dynamodb:${self:provider.region}:*:table/${self:provider.environment.CONTACTS_TABLE}
          - Effect: Allow
            Action:
              - dynamodb:Query
            Resource: arn:aws:dynamodb:${self:provider.region}:*:table/${self:provider.environment.CONTACTS_TABLE}/index/${self:provider.environment.USER_ID_INDEX}
          - Effect: Allow
            Action:
              - dynamodb:Query
            Resource: arn:aws:dynamodb:${self:provider.region}:*:table/${self:provider.environment.CONNECTIONS_TABLE}
The handler entry points to the name of the lambda function inside the file where it’s declared. The events key will set up an HTTP endpoint on AWS API Gateway on the path /contacts with CORS enabled and authorized by the user poll configured inside the authorizer key.
Inside the iamRoleStatements are declared all the IAM permissions required by the function. During deployment, the Serverless framework will automatically create the IAM roles needed by each lambda function.
We will also need to configure a default HTTP 4xx denied response to the API Gateway that includes CORS headers; otherwise, the client will not receive the errors. You can do that by adding the following CloudFormation entry:
resources:
    Resources:
      GatewayResponseDefault4XX:
        Type: AWS::ApiGateway::GatewayResponse
        Properties:
          ResponseParameters:
            gatewayresponse.header.Access-Control-Allow-Origin: "'*'"
            gatewayresponse.header.Access-Control-Allow-Headers: "'Content-Type,X-Amz-Date,Authorization,X-Api-Key,X-Amz-Security-Token'"
            gatewayresponse.header.Access-Control-Allow-Methods: "'GET,OPTIONS,POST,DELETE,PATCH'"
          ResponseType: DEFAULT_4XX
          RestApiId:
            Ref: ApiGatewayRestApi
You can check the declaration of the other 3 functions on the project’s serverless.yml.
We can now deploy the project. The serverless tool will print the addresses of the endpoints created after the process finishes:
$ sls deploy --aws-profile serverless
Serverless: Bundling with Webpack...
Serverless: Copying existing artifacts...
Serverless: Packaging service...
Serverless: Installing dependencies for custom CloudFormation resources...
Serverless: Uploading CloudFormation file to S3...
Serverless: Uploading artifacts...
Serverless: Uploading service my-video-chat.zip file to S3 (7.68 MB)...
Serverless: Uploading custom CloudFormation resources...
Serverless: Validating template...
Serverless: Updating Stack...
Serverless: Checking Stack update progress...
.................................................................
Serverless: Stack update finished...
Service Information
service: my-video-chat
stage: dev
region: us-east-1
stack: my-video-chat-dev
resources: 68
api keys:
  None
endpoints:
  GET - https://*********.execute-api.us-east-1.amazonaws.com/dev/contacts
  POST - https://*********.execute-api.us-east-1.amazonaws.com/dev/contacts
  GET - https://*********.execute-api.us-east-1.amazonaws.com/dev/user
  DELETE - https://*********.execute-api.us-east-1.amazonaws.com/dev/contacts/{contactId}
Adding WebSocket support
The Serverless framework has native support for WebSockets. We will use WebSockets to exchange the information necessary between the two peers to set up the audio/video channel. This post will not delve into details about how the WebRTC negotiation is done. At this point, the only thing we need to know is that each client need to send messages to one another through the WebSocket connection. We will explore later why this is required. The lambda function implemented here works as a relay between the peers.
To configure the WebSocket endpoint, follow these steps:
- Add the following lines to the
providerkey:
  provider:
  # ...
      websocketsApiName: video-chat-websocket-api
      websocketsApiRouteSelectionExpression: $request.body.action
We are going to use the action attribute inside the body of the request to route messages. The API Gateway will read this value and forward the message to the corresponding lambda key with the same route.
- Define the special
$connectand$disconnecthandlers. These lambda functions will be called when the client connection status changes.
functions:
  # ...
  connectionHandler:
    handler: src/lambda/webSocket.handler
    events:
      - websocket:
          route: $connect
          authorizer:
            name: AuthWS
            identitySource:
              - 'route.request.querystring.Auth'
      - websocket:
          route: $disconnect
    iamRoleStatements:
      - Effect: Allow
        Action:
          - dynamodb:Scan
          - dynamodb:Query
          - dynamodb:PutItem
          - dynamodb:DeleteItem
        Resource: arn:aws:dynamodb:${self:provider.region}:*:table/${self:provider.environment.CONNECTIONS_TABLE}
      - Effect: Allow
        Action:
          - execute-api:ManageConnections
          - execute-api:Invoke
        Resource: arn:aws:execute-api:${self:provider.region}:*:*/${self:provider.stage}/*
The same function will handle connection and disconnection. This function will persist the connection status to the Connections table, so it needs DynamoDB access. There is a different authorizer entry defined. We will see more about that later.
- Create a special
$defaulthandler that will receive all the other messages:
functions:
  	# ...
    defaultHandler:
        handler: src/lambda/webSocket.defaultHandler
        events:
          - websocket:
              route: $default
        iamRoleStatements:
          - Effect: Allow
            Action:
              - dynamodb:Scan
              - dynamodb:Query
            Resource: arn:aws:dynamodb:${self:provider.region}:*:table/${self:provider.environment.CONNECTIONS_TABLE}
          - Effect: Allow
            Action:
              - execute-api:ManageConnections
              - execute-api:Invoke
            Resource: arn:aws:execute-api:${self:provider.region}:*:*/${self:provider.stage}/*
This function will also need to have access to DynamoDB to find the connection id of the destination client to forward the message.
WebSocket Authentication
I could not find a way to authenticate the WebSocket handler directly with the Cognito user pool in the same way done to the lambda functions.
So I implemented a custom authenticator that validates Cognito’s JWT token.
This snippet on the $connecthandler definition points to another lambda function in charge of the authorization and configures where the JWT value is expected.
          authorizer:
            name: AuthWS
            identitySource:
              - 'route.request.querystring.Auth'
Here is the serverless.yml definition of the AuthWS function:
functions:
  # ...
  AuthWS:
    handler: src/auth/wsAuthorizer.handler
The source code the handler above is based on the example from the AWS documentation and is available here.
Deploying the back-end
Right now, our back-end code is finished and can be deployed with:
$ sls deploy --aws-profile serverless
This time, the tool will print a new URL with the WebSocket’s endpoint address.
Resources
- https://www.serverless.com/framework/docs/providers/aws/
- https://docs.aws.amazon.com/IAM/latest/UserGuide/introduction.html
- https://docs.aws.amazon.com/AWSCloudFormation/latest/UserGuide/template-formats.html
- https://docs.aws.amazon.com/lambda/index.html
- https://docs.aws.amazon.com/amazondynamodb/latest/developerguide/Introduction.html
- https://docs.aws.amazon.com/apigateway/latest/developerguide/welcome.html